 DispatchSMS

SECTION VI. Using ComTekk DispatchSMS
CONTENTS
1. Running ComTekk DispatchSMS
If you haven't yet done so, install the software and enter your registration key if you have already purchased a license. DispatchSMS will function without a license for a 15-day trial period.
Once DispatchSMS has been successfully installed, you may simply double-click the DispatchSMS desktop icon or Click the Windows Start menu, then Programs, choose the ComTekk folder, then DispatchSMS.
Continue on to Section 2 below for detailed description of the buttons and screens.
2. The DispatchSMS Console
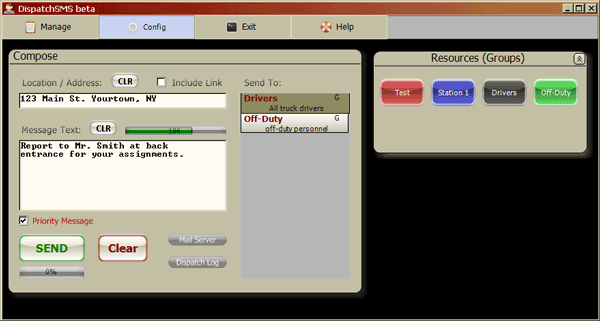
The main console screen consists of 3 panels, Composition, Resources (Groups), and Members plus the Main Menu and Status Bar at the bottom of the window. All controls are operated using a single click of the left mouse button unless otherwise indicated.
2.1 Compose - Use this panel to compose and send text messages.
Location/Address - (OPTIONAL) Enter a street address, intersection or place name here. To erase the contents of this field, click the CLR button.
Include Link - Check this box to include a short, clickable map link (URL), based on Message Settings. The link will be included in the message body.
Message Text - This is the main body of the message. Enter your text information or instructions here. To erase the contents of this field, click the CLR button.
The message length progress bar will keep track of total message length. SMS messages are typically limited to 140-240 characters, depending upon the recipient's carrier. Large messages may be truncated or split into 2 or more separate messages at the receiving end, which may result in additional usage charges, depending on the recipient's calling plan.
Priority Message - This will cause the message to be sent with "High Priority" status. Some services may ignore this status (such as GMail), however most will give an indication in the recipient's Inbox.
Sent To: - This is a list of the groups and/or individuals to whom the message will be sent. Recipients are added by clicking group buttons or by double-clicking individuals. To remove a recipient, click once to highlight, then press the Del key on number pad. The list will be cleared when the CLEAR button is pressed.
CLEAR - Clears all text and recipients (Send To). Click this button before composing a new message, or just enter new text info to be sent to the same recipients. The CLR buttons are used to clear just the Location/Address or Message Text fields.
Mail Server - status light indicates email activity (see legend below). Status will be gray when server checking is disabled in Diagnostics. Green when ready, Red indicates unable to connect to email server. Additionally, Yellow may appear if a periodic server check failed.
Legend OFF / Disabled ON / Enabled / Ok Error Condition Busy, working Dispatch Log - Status light indicates whether event logging is active.
SEND - Press this button to send your message to all recipients in the Send To list. The bar below the SEND button will indicate progress as message is being sent.
2.2 Resources (Groups) - Drop-down panel, contains a button for each group as defined in the Group List. Press desired button to add group to the Send To list. Each group can contain one or more individuals (Members). The message will be sent to every member of the group, when added to the Send To list. To remove a group from the Send To list, click once to highlight, then press the Del key on number pad.
Click the double arrow button in upper-right corner to expand or collapse panels. If Members panel is not visible, collapse the Groups panel to reveal.
2.3 Members - Drop-down panel located just below the Groups panel, contains names of all the individuals (Members) entered in the Email (Member) List. Double-click on the name to add an individual to the Send To list. To remove a member from the Send To list, click once to highlight, then press the Del key on number pad. An alphabetical index is provided on the right side of the member list for convenience. Click a letter to show those names beginning with that letter. The member list may not be visible if disabled in Settings.
2.4 Main Menu
Manage->
Members - Add or edit the Members email list. Requires password if protect option is enabled.
Groups - Add or edit the Resources/Groups list. Requires password if protect option is enabled.
Config - Opens the DispatchSMS Settings window. Requires password if protect option is enabled.
Exit - Shut down and exit DispatchSMS. A YES/NO confirmation dialog will appear if enabled in settings.
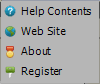
Help->
Help Contents - opens the DispatchSMS user manual [this file] in your default HTML viewer or Internet browser (Shortcut: F1 key)
Web Site - Opens the ComTekk web site in your default Internet browser.
About - Displays information about this software.
Register - used to enter your license activation key.

3. Config [Settings] Window
To access the settings screen :
From the Main Menu, click Config.
Click here for help on Settings.