EASAlert
![]()
QUICK START
NOTE: Click on red text for more details on highlighted item
1. Install ComTekk EASAlert
1.1 What you will need:
- A suitable computer running Microsoft Windows (see Requirements)
- Radio or TV receiver, tuned to correct frequency (or channel).
- Suitable audio cable for connecting receiver's audio output to the computer sound card input (see section 2 below).
- If using text/email messaging, email address, and/or mobile telephone number/carrier for each individual who will receive alert notifications.
1.2 If you haven't already, install the software and enter registration key if you have already purchased a license.
You may use the software for evaluation purposes up to 30 days without purchasing a license.
2. Connect Receiver Audio
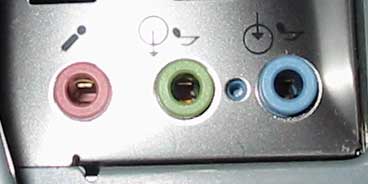
2.1 Preferred method: Using a 1/8" computer audio or iPod cable (either mono or stereo type should work),
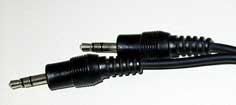
connect receiver's speaker output to computer sound card's MIC (usually pink/red), LINE (usually blue), or AUX analog input:
2.2 Verify receiver is tuned to the correct frequency, and receiving desired dispatch station clearly (excessive static or interference can cause missed alerts). Receiver volume should usually be no higher than about 25%.
2.3 Be sure computer speakers are connected, turned on and volume up part way.
NOTE: If you don't have a way to connect audio directly to the computer, place the computer microphone close to receiver's speaker. The downside to this method is background noise may be picked up in the recording.
3. Configure EASAlert Audio Settings
3.1 Run EASAlert. Select Setup -> Preferences from the main menu. Note that all settings are saved upon normal close (exit) of EASAlert.
3.2 Click the Audio Source tab in EASAlert Settings window. (Audio Device selector will not appear on Windows 7/Vista)
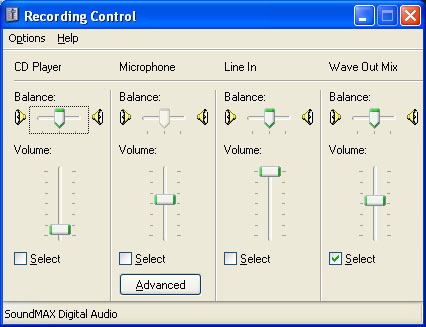
3.3 WINDOWS 2000/XP: Select the Audio Device from the drop-down list at right if more than one sound card is available. Click the Audio Source button to open the Windows recording device selection dialog (shown below). Now select the desired input line by clicking the appropriate Select box. Adjust the input level of this device as described in step 3.4.
Windows 2000/XP Recording Control Panel
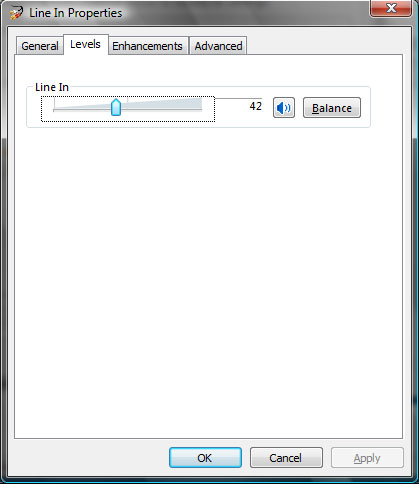
WINDOWS 7 & VISTA: Click the Audio Source button to open the Windows recording device selection dialog (shown below). Click once on the desired input device to select. If more than one device is available, click the Set Default button to make it your default recording device. Click Properties, then select the Levels tab to adjust the input level of this device as described in step 3.4.
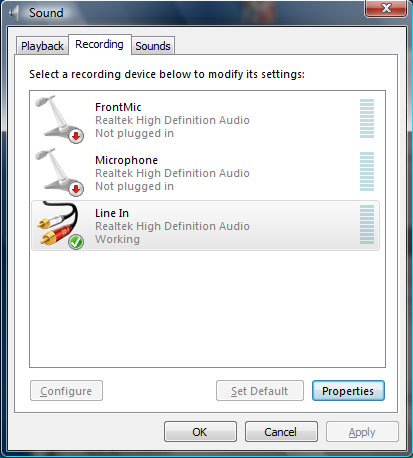
Windows 7 / Vista recording device selection (left) and properties (right).
3.4 Be sure the Mute option in EASAlert is un-checked during the setup process. Listen for receiver audio through computer speakers - it should be clear and crisp. Watch VU meter for level well into the blue, peaking in red is ok. Adjust the level control below Input Source as needed. It may also be necessary to adjust the receiver's volume control. If level is too high, decoder will not function properly!
3.5 The Squelch control should normally be set to a level in the lower blue range of the VU Meter. The default setting will work fine in most cases.
3.6 The Audio Source button is provided as a convenience for accessing the Windows audio control panel if needed.
4. Decoder Settings
Decoder tab: In most cases, these settings should not need adjustment - defaults are recommended. See Setup Section for more info.
5. Alert Options
5.1 Audio/Visual alerts: Click on the Alert Options tab. These settings determine what actions will be taken when an alert is detected. Most of these items should be self-explanatory, but brief descriptions will be provided here. See the manual for complete details.
5.1.1 Max. Alert Time - determines how long (in minutes) the following audio/visual alerts will repeat. Clicking the RESET button on the main screen will cancel the alert.
5.1.2 Play Sound - plays a sound file selected by clicking the
button. The sound file selected should be .WAV type. Check the Loop box for continuous repeat.
5.1.3 Run File - A powerful feature, launches any external program, script or associated file when alert is received. Click the
5.2 Advanced Options controls event logging, audio recording and emailing features.
5.2.1 Log Alerts - Check this box to enable event logging to CSV text file. A dialog will open allowing you to select the log file name, as well as the Logs/Recordings Folder. Log files and recorded WAV files will both be stored in this folder. Mouse over to see complete folder name.
5.2.2 Record Alerts - Enables recording of WAV file each time an alert is detected. The file name will be added to the log for later review. Select the duration of recording. The default of 30 seconds is usually long enough to capture critical dispatch information. Keep in mind, longer recordings mean larger files which take more time to send and receive. It's best to keep this time as short as possible.
5.2.3 WAV / MP3- Select WAV or MP3 audio file recording format. (Currently only WAV is available in Windows 7/Vista)
5.2.4 Send Email - Will send emails based on the particular alert tones received, with or without attached WAV files. This setup will be explained in the next section.
5.2.5 Ignore repeat alerts for same unit - Some dispatchers will always send the same call twice to in case some units did not receive it the first time. This option will help prevent duplicate emails/recordings from being sent for every call.
6. Mail Setup
6.1 Mail Server Settings - Click the Mail tab to access these settings. To utilize the email feature, you must have an email account. Most ISPs provide at least one email account. Note that SSL/TLS is required by most webmail providers such as Gmail, Hotmail, Yahoo!, etc. Auto Configure is provided for some of the more common email providers.
6.1.1 First click the Auto Configure drop-down to see if your provider is listed. Making a selection here will populate the basic settings for that particular provider. A message box will appear, propting you to enter your email address, and account login & password.
NOTE: Be sure SMTP/POP3 access is enabled for your email account! Many web-mail providers do not allow this access by default.
6.1.2 Email Address - enter the complete email address for the account you will be using to send mail.
6.1.3 SMTP Server - This is your OUTGOING mail server address, as provided by your email service. Port 25 is the standard for outgoing email - do not change it unless you know the specific port number.
6.1.4 Authentication Required - Some ISPs don't require a login/password if you are connected to their network. If this box is checked, you must provide the User Name and Password as well. User Name will be filled in automatically after Email Address is entered.
6.1.5 Use SSL - enables SSL (for secure server). Do not use this option unless your mail provider requires it. Most free web mail services such as Gmail, Yahoo, Hotmail, require SSL. Port 465 is normally used for SSL connections.
6.1.6 Long/Short Format - see Mail Settings
6.2 Email Settings are foind in the lower panel of the Mail tab.
6.2.1 Email To: - (Required) email address for all mail messages with audio file attached [MMS]. A single email will be sent with all responder addresses hidden in the Bcc (Blind Carbon-Copy) field. By sending a single email instead of separate emails to every responder, time required to send notifications is drastically reduced.
6.2.2 Attach Audio File - be sure this box is checked if you want responders to receive audio file.
6.2.3 Signature - will appear at the end of every message sent. Keep it as short as possible, but to be legal it should at least have a contact name and number in case a recipient wishes to be removed from the list.
6.3 Test Email Settings - To check your settings, click the Test Email button, which will open the messaging window:
6.3.1 Enter a recipient's email address (preferably one you have immediate access to), then click Send Test Email. The process shouldn't take more than half a minute. You can monitor progress in the Activity window. Below is an example of a successful transmission, ending with the message "Connection closed." Any error messages displayed here will aid in troubleshooting your email settings.
6.3.2 Upon successful send, check the Inbox of recipient email address. Depending on the service and software, the test email could appear immediately, or take a few minutes or more. NOTE: There is no way to control how fast an email is delivered once it has been sent.
6.3.3 Click Close when you have finished testing.
7. Email List
8.1 To access the Email List: From the Settings window, click the Alert List button in the lower right corner, or from the Main Menu, click Setup -> Alert List.
To edit an existing entry, simply double-click on it. Press [Enter] or click "OK" when finished. NOTE: The "MP3" field in the editing window is not used.
To sort the entries, click on the column heading, for example to sort entries by unit name, click on the Unit ID heading. Click again to invert sort order. The Undo Sort button will return entries to their original order. To delete an entry, click on it (single-click) to highlight that entry, then click the Delete Responder button.
8.1.1 To add a new entry, click the Add Recipient button. This entry will be inserted into the next available empty row. Use the Tab key to move cursor to next field. Click OK or press Enter key when finished editing entry.
Name - recipient's name, anything can go here.
Email or Mobile No. - Enter recipient's email address OR 10-digit mobile phone number (digits only, NO spaces or puctuation - see example above).
Be sure to get permission before adding mobile users! SMS/MMS messages are not free to receive. Users will need to have a calling plan that includes sufficient allowance for these messages. Some plans include unlimited text/pix, or it can be purchased as an option, usually a few dollars a month. Pricing and plans vary between carriers.
Carrier - A drop-down list will appear when you click on this field. Select <email> if you entered an email address. If a mobile phone number was entered, select the mobile user's carrier (service provider) from the list.
If your carrier is not listed, select <email> and use one of these to locate SMS/MMS gateway:
http://www.mutube.com/projects/open-email-to-sms/gateway-list/
http://en.wikipedia.org/wiki/List_of_SMS_gateways
8. Final Step: Save email list
9.1 Click Save and Close once you are satisfied all entries are correct.
Congratulations! You should now be ready to start using EASAlert. Testing is highly recommended. This may require asking your dispatcher to transmit one or more test pages to ensure everything is working properly and all intended recipients are able to receive their alert messages.
Next: Using EASAlert
Disclaimer:
Actual performance may vary between different computers and sound cards. The author makes no warranties or guarantees of performance or suitability for any particular purpose, and assumes no liability whatsoever for the use or misuse of any software products. This product is not intended for use as a primary means of notification.