

Using ComTekk SELCAL
1. Running ComTekk SELCAL
First-time users must enter their user registration information to enable the software. This will be sent via email after purchase is made.
Once ComTekk SELCAL has been successfully installed, you may simply double-click the CTSelcal desktop icon or Click the Windows Start menu, then Programs, choose the ComTekk folder, then CTSelcal.
To control CTSelcal:
- To run the program, click the desktop icon or go to Start->Programs->ComTekk->CTSelcal .
- The top dot-matrix display shows the SELCAL Code to be transmitted. A green "Ready" indicates a valid code is ready for transmission.
- To Transmit the tone sequence, simply click the "SEND" button. You can simply hold the radio's microphone up to a computer speaker, or the sound card's output may be wired to the radio. Contact ComTekk for a sound card to radio interface unit.
- If NOT using ComTekk Radio Interface, be sure to run the Calibration on first use to ensure accurate tones are produced.
- To exit the program, click "Exit" under the "File" menu, or just click the "X" button in the upper-right corner of the window.
Continue on to Section 2 below for detailed description of the buttons and screens.
2. The CTSelcal v4.1 Controls and Indicators
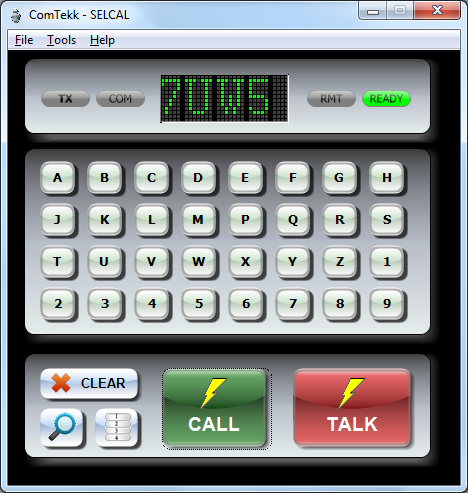
Indicators:
1. Dot-matrix Display - shows the SELCAL code to be transmitted. Use the letter keys below the display to enter the 4-letter code.
2. Ready - When lit, indicates a valid 4-digit code has been entered and is ready for transmission. The CALL button is now enabled. Preset buttons will work even if Ready is not lit.
3. TX - Indicates the SELCAL tones are being generated and transmitter is engaged (if using VOX or serial PTT). If speakers are connected, the tones should be audible.
4. COM - Indicates serial port TX control is active (COM port has been opened). Lamp will indicate off (gray) if using VOX control.
5. RMT - Radio control port status. Indicates green when active (COM port open).
Controls:
1. A..9 letter/number keys - use these buttons to input the code sequence to be sent.
2. CLEAR - Clears the code display. If pressed while sending, this will immediately terminate the transmission.
3. CALL - Begin transmission of the code sequence displayed. Click once to send SELCAL code. Ready light must be green indicated a valid code was entered. HF transmitter must be in AM mode when sending SELCAL signal, not USB/SSB.
4. TALK - Begin transmission of voice audio. Also known as PTT (push-to-talk). Click and hold down the left mouse button to transmit, release to stop. Speak into computer microphone/headset. The space bar may also be used as PTT when the button is selected (it will be highlighted with a thin dotted line). Click once to select.
5. Aircraft Directory/Lookup (magnifier icon) - new in Ver.3.1, enables quick search of the database. Just start typing in the SEARCH box, and all matches will be displayed. When a selection is made, the CALL button will be enabled.
6. PRESETS - Show/hide the preset button panel.
Menu:
1. File->Exit - Close/exit the program. All settings will be saved for next session.
2. Tools->Settings - Opens the Settings [preferences] window.
3. Tools->Audio Out - Opens the Windows Playback control panel for sound device OUTPUT settings. This will affect the transmit (TX) audio.
4. Tools->Audio In - Opens the Windows Recording control panel for sound device INPUT settings. This is where the microphone audio is set up.
5. Help->Contents - Opens the User Manual [this file].
6. Help->Website - Opens a browser window and takes you to the ComTekk Software home page, where you can check on the latest releases, upgrades and hardware.
7. Help->Register - Takes you to the software registration window, where your activation key is entered.
8. Help->About - Displays the "About" screen, showing version and user registration info.
3. Preset buttons

1. To activate the SELCAL Presets panel, click the Presets button on main console screen. Click Presets button again to hide this panel. It may be positioned anywhere on the desktop.
2. To transmit a preset SELCAL code, simply click once the desired preset button. If the Hide preset option (found in Settings) is selected, code will not be displayed when sending. CALL button will be activated and TX indicator will turn red during transmission.
If an invalid code was stored in the preset, an error message will appear and there will be no transmission.
1. Using the Aircraft Directory
1. To activate, click the magnifier icon.

2. Start typing in the SEARCH box to filter the list. All entries containing typed characters will be displayed. When your search results in a single entry, it will be highlighted and the CALL button will be enabled (green). Click the SEARCH box to clear and start a new search.
An aircraft can be selected at any time by clicking the entry. This will enable the CALL button.
To scroll, click any of the aircraft entries, then use the mouse wheel to move the list up or down.
3. To hide the Lookup window, either click the X to close, or click the magnifier icon on main screen.