SafAlert Notifier

QUICK START
Ver. 3.17
This guide will walk you through the important (required) settings to get SafAlert up and running as quickly as possible.
NOTE: Click on red text links for more details on particular items
1. Install ComTekk SafAlert
1.1 What you will need:
- A suitable computer running Microsoft Windows (see Requirements)
- Radio receiver, tuned to your agency's dispatch frequency (channel).
- Suitable audio cable for connecting receiver's audio output to the computer sound card input (see section 2 below).
- Paging tone codes (audio frequencies) for each department/agency/unit for which you wish to receive alerts. If you don't have access to the tone codes, they can easily be acquired using ComTekk's 2-Tone Decoder. For departments that only use 1 or 2 codes, just use the "Capture Last" feature.
- If using text/email messaging, email addresses for each individual who will receive alert notifications.
1.3 If you have already purchased a license, enter registration key.
NOTE: You may use the software for evaluation purposes up to 15 days without purchasing a license.
2. Connect Receiver Audio:
2.1 Preferred method: Using a 1/8" computer audio or iPod cable (either mono or stereo type should work).
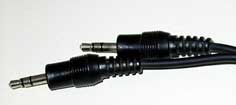
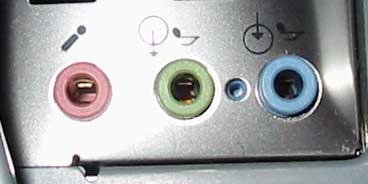
Connect receiver's speaker output to computer sound card's MIC (usually pink/red), LINE (usually blue), or AUX analog input. LINE IN is preferred when available.
2.2 Verify receiver is tuned to the correct frequency, and receiving desired dispatch station clearly (excessive static or interference can cause missed alerts). Receiver volume should usually be no higher than about 25%.
2.3 Be sure computer speakers are connected, turned on and volume up part way.
NOTE: If you don't have a way to connect audio directly to the computer, place the computer microphone close to receiver's speaker (even a walkie-talkie will work fine for this). The downside is, background noise will be picked up and recorded too.
3. Configure SafAlert Audio Settings
3.1 Run SafAlert. Select Setup -> Preferences from the main menu. Note that all settings are saved upon normal close (exit) of SafAlert.
3.2 Click the Audio Source tab in SafAlert Preferences window.
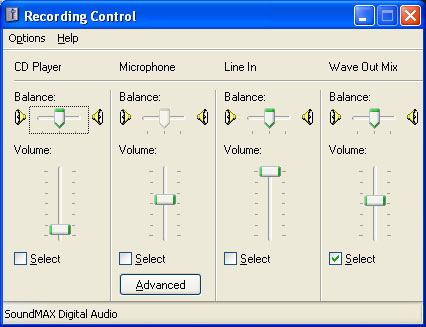
SafAlert audio source controls (Windows 2000/XP view)3.3 WINDOWS 2000/XP: Select the Audio Input Device from the drop-down list at right if more than one sound card is available. Click the Audio Source button to open the Windows recording device selection dialog (shown below). Now select the desired input line by clicking the appropriate Select box. Adjust the input level of this device as described in step 3.4.
Windows 2000/XP Recording Control Panel
WINDOWS 7/8 & VISTA: Select the Audio Input Device from the drop-down list at right. Click the Audio Source button to open the Windows recording device selection dialog (shown below). Click once on the desired input device to select. If more than one device is available, click the Set Default button to make it your default recording device. Click Properties, then select the Levels tab to adjust the input level of this device as described in step 3.4.
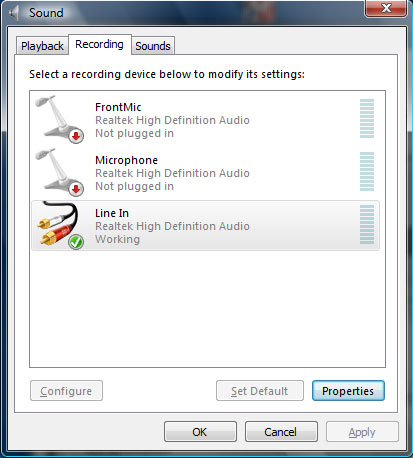
Windows 7 / Vista recording device selection (left) and properties (right).
3.4 Be sure the Mute option in SafAlert is un-checked during the setup process. Listen for receiver audio through computer speakers - it should be clear and crisp. Watch VU meter for level well into the blue, peaking in red is ok. Adjust the Windows Recording level control (in Audio Source) as needed. It may also be necessary to adjust the receiver's volume control. If level is too high, decoder will not function properly!
3.5 The Squelch control should normally be set to a level in the lower blue range of the VU Meter. The default setting will work fine in most cases.
3.6 The Audio Source button is provided as a convenience for accessing the Windows audio control panel if needed in step 3.4.

4. Decoder Settings
Decoder tab: In most cases, these settings should not need adjustment - defaults are recommended. See Setup Section for more info.
5. Alert, Logging and Recording Options
5.1 Audio/Visual alerts: Click on the Alert Options tab. These settings determine what actions will be taken when an alert is detected. Most of these items should be self-explanatory, but some brief descriptions will be provided here. See the Setup section for complete details.
5.1.1 Max. Alert Time - determines how long (in minutes) the following audio/visual alerts will repeat. Clicking the RESET button on the main screen will cancel the alert.
5.1.2 Send Email - Causes SafAlert to send email/MMS messages based on the particular alert tones received, with or without attached audio files. This setup will be explained in the next section. If this option is not checked, no messages will be sent.
5.1.3 Play Sound - plays a sound file selected by clicking the
button. The sound file selected should be .WAV type. Check the Loop box for continuous repeat.
5.1.4 Ignore repeat alerts for last unit - Some dispatchers will always send the same call twice in case some units did not receive it the first time. This option will help prevent duplicate emails/recordings from being sent for every call.
See Setup Section for more an these settings.
5.2 Loging / Recording Options controls event logging and audio recording features. Click the Log-Record tab.
5.2.1 Log Alerts - Check this box to enable event logging to CSV text file. A dialog will open allowing you to select the log file name, as well as the Logs/Recordings Folder. Log files and recorded MP3 files will both be stored in this folder. Mouse over to see complete folder name.
5.2.2 Record Alerts - Enables recording of audio file when an alert is decoded. Select the duration of recording. The default of 30 seconds is usually long enough to capture critical dispatch information. Keep in mind, longer recordings mean larger files which take more time to send and receive. It's best to keep this time as short as possible.
Auto-extend recording on late tones - When enabled, this will extend recording time whenever new tones are received while system is still recording the first call. In most cases, this option is not needed. Multiple "stacked" tones sent close together will be handled by normal processing.
5.2.3 Audio File Format - Select MP3 audio file recording format. 48kbps is currently required for delivery to AT&T phones via MMS.
5.2.4 Record Mode, Delay- Three modes of recording are available (default settings are recommended):
- Immediate - Recording will start immediately upon receipt of first tone-out, no delay. One or more tones may be heard in recording.
- Timed Delay After Tones - Recording starts after tones have been sent + Delay seconds. This is the recommended setting.
- Voice Detect - Recording starts after tones, but not until voice is detected, or maximum Delay seconds.
See Setup Section for more an these settings.
6. Mail Setup
6.1 Mail Server Settings - Click the Mail tab to access these settings. To utilize the email feature, you must have an email account. Most ISPs provide at least one email account - we recommend using this account for best reliability and least hassle. Auto Configure is provided for some of the most common email providers.
6.1.1 First click the Auto Configure drop-down to see if your mail provider is listed. Making a selection here will populate the basic settings for that particular provider. A message box will appear, prompting you to enter your email address, and account login & password. If your provider is not listed, consult your provider for outgoing (SMTP) mail configuration. This information is usually available on the provider's support web site.
6.1.2 Email Address - enter the complete email FROM address for the account you will be using to send mail.
6.1.3 SMTP Server - This is your OUTGOING mail server address, as provided by your email service. Port 25 is the standard for outgoing email - do not change it unless your email provider requires a different port number.
6.1.4 Authentication Required - Some ISPs don't require a login/password if you are connected to their network. If this box is checked, you must provide the User Name and Password as well. User Name will be filled in automatically after Email Address is entered.
6.1.5 Use SSL - Some mail servers require a SSL connection (Secure Socket Layer). SafAlert now supports this feature. Most free webmail services such as *Gmail, Hotmail, Yahoo! require SSL. Ports 465 and 587 are most commonly used for outgoing SSL. Port 25 is generally NOT used with SSL connections. If you're not sure, try sending a test message with this box checked or unchecked to see which works.
*IMPORTANT NOTES: GMX service has proven less than reliable. Webmail servers will usually block your account if more than 5-10 messages are sent at once! We highly recommend using your ISP or ComTekk's low-cost SMTP service.
6.2 Email Settings are found in the lower panel of the Mail tab.
6.2.1 Email To: - (Required) email address for all mail messages with audio file attached [MMS]. A single email will be sent with up to 10 responder addresses hidden in the Bcc (Blind Carbon-Copy) field. By sending a single email to as many as 10 responders at once, the time required to send notifications is greatly reduced. This recipient will receive one or more copies of every alert sent! You can use a 'fake' address here to prevent this, but it must be formatted as a valid email "name@somedomain.com"
6.2.2 Signature - will appear at the end of every message sent. Keep it as short as possible, but to be legal it should at least have a contact name and number in case a recipient wishes to be removed from the list.
6.3 Test Email Settings - To check your settings, click the Test Email button, which will open the messaging window:
6.3.1 Enter a recipient's email address (preferably one you have immediate access to), then click Send Test Email. The process shouldn't take more than half a minute. You can monitor progress in the Activity window (this is the Event Log). Below is an example of a successful transmission, ending with the message "Connection closed." Any error messages displayed here will aid in troubleshooting your email settings.
6.3.2 Upon successful send, check the Inbox of recipient email address. Depending on the service and software, the test email could appear immediately, or take a few minutes or more. NOTE: There is no way to control how fast an email or MMS is delivered once it has been sent.
6.3.3 Click Close when you have finished testing.

7. Tone-out List
7.1 From the Preferences window, click the Alert List button in the lower right corner, or from the Main Menu, click Setup -> Alert List.
7.1.1 Start with the top section "Tone-out List" Click the Add Tone-out
button to make a new entry. This entry will be inserted into the next available empty row. Click on the highlighted area to begin editing. Use the Tab key to move cursor to next field. Click OK or press Enter key when finished editing entry. You may need to click twice to begin editing (NOT double-click).
To edit an existing entry, simply click on the text to highlight (you may have to click twice to enable editing). Press the Tab key to advance to the next field.
To sort the entries, click on the column heading, for example to sort entries by unit name, click on the Unit ID heading. Click again to invert sort order. The Undo Sort button will return entries to their original order.
7.1.2 Enter each tone frequency in Hertz (Hz). If there are two tones, they MUST be in correct order, first tone is Tone 1, second tone is Tone 2. For single-tone alerts, Tone 2 should be left blank. See examples above.
NOTE: If you don't have your department's tone frequencies, they may be obtained using our ComTekk 2-Tone Decoder software (half-price when ordered with SafAlert).
7.1.3 Enter a unique Unit ID. This should be the same or similar to over-the-air unit designator. Important note: Unit ID is the key field used to match alerts to corresponding emails.
Be sure each Unit ID is unique and not contained in part of another. For example:
Truck-7
Truck-71This will cause Truck-71 to also receive calls for Truck-7. Instead, use Truck-07 as the ID.
7.1.4 Enter Text Message - this text will appear in the body of alert emails or text message if sent to a mobile phone.
8. Email List
8.1 To access the Email List: From the Preferences window, click the Alert List button in the lower right corner, or from the Main Menu, choose Setup -> Alert List.
To edit an existing entry, simply click on the text (you may have to click twice to enable editing). Press the Tab key to advance to the next field.
To sort the entries, click on the column heading, for example to sort entries by unit name, click on the Unit ID heading. Click again to invert sort order. The Undo Sort button will return entries to their original order. To delete an entry, click on it (single-click) to highlight that entry, then click the Delete Responder button.
8.1.1 To add a new entry, click the Add Responder
button. Click on the highlighted area to begin editing. Use the Tab key to move cursor to next field. Click OK or press Enter key when finished editing entry.
Name - recipient's name, anything can go here.
Email or Mobile No. - Enter recipient's email address OR 10-digit mobile phone number (digits only, NO spaces or puctuation - see example above).
Be sure to get permission before adding mobile users! SMS/MMS messages are not free to receive. Users will need to have a calling plan that includes sufficient allowance for these messages. Some plans include unlimited text/pix, or it can be purchased as an option, usually a few dollars a month. Pricing and plans vary between carriers.
Carrier - A drop-down list will appear when you click on this field. Select <email> if you entered an email address. If a mobile phone number was entered, select the mobile user's carrier (service provider) from the list.
If your carrier is not listed, select <email> and use one of these to locate SMS/MMS gateway:
http://www.mutube.com/projects/open-email-to-sms/gateway-list/
http://en.wikipedia.org/wiki/List_of_SMS_gateways
If sending audio, you must use the MMS address. SMS is for TEXT-ONLY messages.
Audio - Check this box to send audio attachment. If not checked, a text-only notification will be sent. For mobile numbers, audio attachments are sent using MMS and text-only messages via SMS.
Unit IDs - Critical field: This entry must exactly match the correct Unit ID in the Tone-out List above. Emails will not be sent to incorrect entries - they will simply be ignored. Multiple Unit IDs may be entered and must be separated by a comma and/or space. For example, when tones are decoded for unit ID: "EMC", an email/MMS will be sent to John Smith, along with any other responders with unit id "EMC"
8.2 To send a "carbon copy" of EVERY alert message, enter recipient email in "Email all Alerts to" box. If Audio is checked, audio file will be sent along with email.
NOTE: Using this feature can result in a very large amount of email being sent to this recipient.

9. Final Step: Save alert lists
9.1 Click Save and Close once you are satisfied all entries are correct.
Congratulations! You should now be ready to start using SafAlert. Testing is highly recommended. This may require asking your dispatcher to transmit one or more test pages to ensure everything is working properly and all intended recipients are able to receive their alert messages.
Next: Using SafAlert
Disclaimer:
Actual performance may vary between different computers and sound cards. The author makes no warranties or guarantees of performance or suitability for any particular purpose, and assumes no liability whatsoever for the use or misuse of any software products. This product is not intended for use as a primary means of notification. The author cannot guarantee timely message delivery and has no control over the Internet, third-party mail servers, or carrier networks.