Tone Generator
User Manual
v1.6
User Settings & Preferences
1. Sound Card Calibration
Computer sound cards vary greatly in quality and design. They have their own time-base which controls the A/D and D/A sampling rate, which in turn directly affects the frequency. The automatic calibration routine allows for compensation for timebase error, thus allowing accurate frequency synthesis.
Versions 1.06 and above include auto-calibration, which does not require any specialized equipment. However, a FULL-DUPLEX sound card is required. This means the card has the ability to play and record simultaneously. Nearly all newer sound cards are full duplex.
NOTE: Calibration need only be performed once for a particular sound card.
There are two modes for calibration, Auto and Manual. The manual option is a new feature in version 1.50 provided as a convience for those who wish to calibrate to an external reference, such as a precision frequency counter. To perform a manual calibration, click the "Manual Set" checkbox, then follow the on-screen instructions.
To open the Windows recording control / sound device settings, click the "Mixer" button.
AUTO CALIBRATION PROCEDURE:
1. Loop the sound card OUTPUT back to its INPUT. Three different ways to do this are presented below:
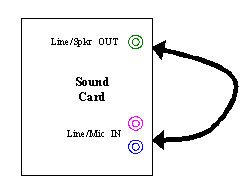
Option1: Use a 1/8" stereo cable to connect Line/Speaker OUT to Line/Aux/Mic IN.
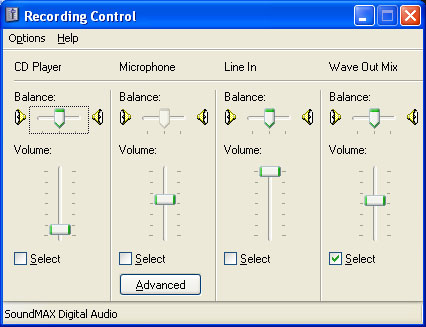
Option 2: Open the Windows Recording Control panel, by clicking the "Mixer" button in the calibration tab. Select the "Wave Out Mix" (or similar) checkbox to create an internal loopback. Not all sound card drivers have this option. If available, it negates the need for an external connection.
Option 3: Audio pickup - If you have a microphone connected to (or internal to) your computer, open the Windows Recording Control panel from the File->Tools menu. Select the "Microphone" checkbox to enable the MIC input. Place the microphone directly in front of a computer speaker so it will pick up the sound from the tone generator. Take care not to get it too close which will generate feedback, voiding the calibration.
2. Once the loopback is established using one of the methods described above, open the ComTekk Settings window, using the toolbar or or select Settings from the File menu. Select the Calibration tab. Click START.
If using speakers and loopback is working, you should hear a very short tone. The Status will change to "Calibrated" and the frequency and calibration factor will be displayed. The VU meter will indicate relative INPUT level. It may be necessary to adjust input or output levels, or the microphone position if using Option 3 for loopback.
The measured frequency should be somewhere close to 1,000 Hz. If it is closer to 2,000 Hz, the volume is most likely too high. You will have to restart ComTekk and run the calibration again.
If the calibration tone was not detected, this will be indicated on the "Status" line. Make adjustments and click START to try again. It may be necessary to attempt a different loopback method if you can't get it to work after several tries.
Notes:
- All settings are saved to INI file upon exiting ComTekk.
- For instructions on using the Windows Vista™ Volume Mixer, there's a good article on SoftPedia.
2. Tone Remote Settings
These adjustments are provided for customization and convenience, allowing for the most precise signal emulation. Under normal circumstances, you should not need to change these settings.
Recommended Equipment:
- Transmission Impairment (TIMS) Test Set, such as the Ameritec AM44
- Digital Storage Oscilloscope (DSO)
- Shielded cables with appropriate connectors/adaptors
Connect computer sound device output to 600-ohm line or circuit to be tested and to scope or TIMS.
*WARNING* Do Not connect sound device directly to a POTS line or other circuit which could have voltage present. This could damage the computer as it does not provide any protection against high voltage or transient surges. Please Contact Us if you need a line interface adaptor.
Adjustment Procedures:
1. Open both the Settings window (File->Settings) and the Tone Remote Generator (Generate->Tone Remote). In the Settings window, select the Tone Remote tab.

2. From the Tone Remote window, select the desired Function and Guard tone frequencies. Select Single Tone Mode if desired.
3. To set Hold Tone level, click the PTT button to begin continuous transmission. Set WinVolume and Mixer if needed to achieve desired signal output**.
Using the up/down buttons for each field, adjust dBm level as required for single or dual-tone mode in the Settings screen. NOTE: To see the change, you must stop the generator, then start again. To restore the original stored values, click the Revert button; To keep the new values, click OK.
4. For Guard Tone or Function Tone adjustments, use DSO in storage mode to capture the initial transmission. Use Channel (CH) button in the Tone Remote Generator window to transmit.
5. Adjust dual or single-tone durations, then adjust levels if needed.
**Remember that the Windows Volume (WinVolume, Ctrl+V) will control the maximum output of the sound device. The ComTekk Mixer level control sets the Tone Remote level, relative to Windows Volume. These level settings are relative to the maximum generator output.
Note: All settings are saved to INI file upon exiting ComTekk.
3. General Preferences
1. Open the Settings window (File->Settings or Ctrl+S) and click on the General tab.
2. "CTCSS Generator half volume" when checked, will reduce the output of this generator by 50%. This option is provided as a convenience for easier Mixer level adjustment at low levels.
3. Audio compression provides the option to compress WAV files when recording from ComTekk. If "None" is selected, the Windows default setting will be used. When checked, the format indicated in the box below is used (MPEG-3, 11Khz, Mono (1Kb/S). If you have a special application requiring a custom compression algorithm, please Contact Us.
4. Generator resolution is not user-adjustable. If you have a special application requiring a different bit resolution, please Contact Us.
5. Three common Sample Rates are now available: 8,000; 11,025 and 22,050 KHz. If you have a special application requiring a different sample rate, please Contact Us.
Note: All settings are saved upon exiting ComTekk.
4. PTT Relay Control
Open the Settings window (File->Settings or Ctrl+S) and click on the PTT Relay tab.
This feature is designed for use with the ComTekk Universal Radio Interface or an external serial (RS-232) relay circuit and may be used to activate a transmitter's PTT circuit or other electrical device whenever a tone generator Play button ![]() is pressed.
is pressed.
1. Control Port - feature is enabled when a valid serial port is selected (COM1 ~ COM64 supported). If selected port is not available, drop-down will return to the <OFF> position.
2. Control Pin - Select DTR (pin-4) or RTS (pin-7) control pin.
Standard DB-9 serial connections as seen on the back of a computer
3. Active State - determines whether the pin's voltage when activated by the decoder. Select High for positive voltage (+) or Low for negative (-).
4. Hold Time - the time in milli-seconds that the serial pin will remain active after end of tone(s).
5. Test button - Click and hold to cause selected serial port/pin (PTT) to be activated. Release mouse button to deactivate.
NOTE: Always use an isolated external circuit to protect computer from possible damage.