TRC
Tone Remote Console
User Manual
Using ComTekk TRC
CONTENTS:
1. Getting Started
TRC is provided on a 15-day trial basis, after which time registration is required to enable the software. This will be sent via email after purchase is made.
Once TRC has been successfully installed, you may simply double-click the TRC desktop icon or Click the Windows Start menu, then Programs, choose the ComTekk folder, then TRC.
While TRC is loading, the Splash screen will remain visible for about 5 seconds.
There are several ways to exit TRC.
- Click the "X" button in the upper right corner of the application window.
- Click the large "X" button on the Toolbar.
- Select the "File" menu, then "Exit"
Please note that if you have more than one audio device installed, ComTekk will only use the system's default sound device. To change the default device, see Section 6.
Continue on to Section 2 below for detailed description of the Menus and Toolbar...
2. The ComTekk Menus

File Menu:
- Open - (not available in Version 1)
- Exit - closes ComTekk
Tools Menu:
Help Menu:
- Contents - Displays Help Contents
- Website - Directs default browser to ComTekk's Internet home page.
- Register - Allows entry of a user license key to unlock the software.
- About - Shows general info about ComTekk, version, registered user.
3. Mixer Panel
ComTekk Mixer:
If the Mixer is not visible, click the Mixer toolbar button, or select the "View" menu, then click "Mixer." There will be a check-mark next to the menu item showing whether it is visible.
Use the sliders to adjust the relative output level for each corresponding generator or encoder. The control labeled "Burst - Alerts" controls the level of both the Alert tones and Tone Burst, if used.
Use the "CTCSS Generator half volume" checkbox to cut the PL-tone generator output in half, thus making adjustment much easier at low levels.
The "Tone Remote" control sets the relative level of the tone-remote signal generator during transmit and when function keys are activated, such as "Monitor" or changing a channel.
"RX Ind. Threshold" sets the input level required to activate the receive "RX" indicator on the main console screen. It does NOT affect the actual volume of the input, which is set using the Windows Volume Control below. NOTE: for RX Indicator to function, you must enable the appropriate sound card input. See the Recording controls section below.
The "Mute Mic on RX" checkbox, when checked, causes the microphone input to be muted while console is in receive mode. If PTT "Transmit" is activated, the mic will be opened to allow voice audio to pass over the line to the transmitter.
"Mute Line-In on TX" or "Mute Aux-In on TX" when checked, will disable the corresponding inputs to prevent possible feedback or echo from the receiver while transmitting.
The "Audio Device" drop-down box allows selection of an alternate audio output device for Transmit audio (second sound card required). Receive audio will still utilize the systems DEFAULT sound device. Using a different sound card for transmit audio prevents TX audio from being heard by the user while transmitting on a 4-wire line.
4. Windows Volume Controls (XP):
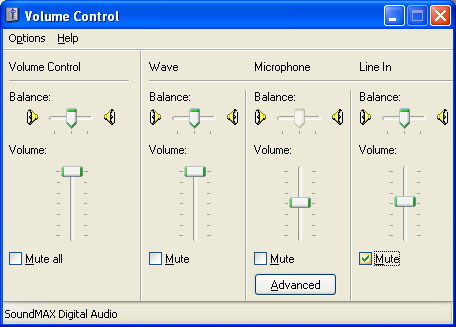
NOTE: Windows Volume Control (Tools->WinVolume, or Ctrl+V) dictates the maximum output of the sound device. The ComTekk mixer level controls are all relative to the Windows master Volume setting. In other words, the Windows Volume settings take precedence over the ComTekk mixer.
Depending on your particular computer's configuration, it may also be necessary to adjust individual WinVolume levels such as "Wave" or "Wavetable." Be sure the master and wave volumes are not muted. This will prevent ComTekk from producing an audible signal.
The Windows Recording Control (below) affects sound device INPUTS, such as LINE, AUX or MICrophone. To access Recording controls, open Windows Volume Control from ComTekk, or with a double-click on the speaker icon in your system tray. Select "Options" from the menu, then "Properties." Click the "Recording" radio button. Be sure the wave item(s) are checked below, then click "OK."
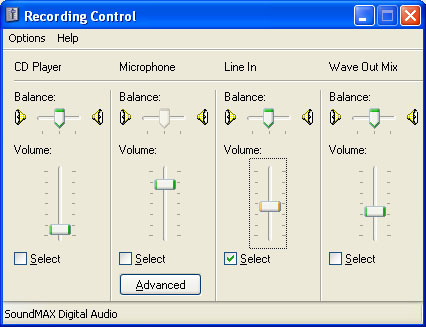
Select the appropriate input where the receiver audio is connected. This is required for proper operation of the automatic muting (see Mixer settings), and RX Indicator on the console.
5. Default Audio Device selection
If you have more than one audio device connected to your computer system, it may be desirable to change which one is used for ComTekk TRC tone-remote console.
1. Access the Windows Control Panel: Click Start->Settings->Control Panel. Depending on your version of Windows and sound card software, this procedure may be slightly different. Consult Windows Help or your sound card documentation if you are unsure of how to access the system Sound settings.
2. Select the "Sounds" or "Sounds and Audio Devices" icon. Then choose the "Audio" tab:
3. Select the desired audio device for Sound Playback. This is the device that will produce your transmitter audio output.
4. If needed, select the Sound Recording device for your receiver's audio source.
5. Click "OK" or "Apply" to save your changes. Note that these changes will affect ALL Windows applications, not just ComTekk!
6. Disabling Windows Event Sounds
It's a good idea to turn off the Windows event sounds so they don't inadvertently get transmitted along with your voice over the air, which could cause undue embarrassment, or even a violation of FCC Rules.
1. Access the Windows Control Panel: Click Start->Settings->Control Panel. Depending on your version of Windows and sound card software, this procedure may be slightly different. Consult Windows Help or your sound card documentation if you are unsure of how to access the system Sound settings.
2. Select the "Sounds" or "Sounds and Audio Devices" icon. Then choose the "Sounds" tab:
3. Before changing the "Sound scheme" selection, you may want to save your current sound scheme if you have previously made any changes. To do this use the "Save As" button and give it a name.
4. Choose "No Sounds" from the drop-down box to disable all Windows event sounds. You can always change this setting later if desired.
5. Click "OK" or "Apply" to save this setting.
Now you can operate TRC without the worry of extraneous noises being added to your transmitted audio.
8. Tone-remote console operation
Upon startup, TRC will transmit the function tone sequence corresponding to the default channel selection, which serves to initialize the proper channel on the remote equipment, if connected.
Basic Controls:
"RX" Indicator - gives a visual indication that receive audio is present on the sound card input (left or right channel). It may be necessary to adjust the RX Ind. Threshold on the Mixer panel. Be sure the appropriate sound card input is selected in the Windows Recording controls.
"Channel" - Click the up/down buttons to change channels, or up/down arrows on the keyboard when this control is active (selected). The 7-segment LED-type display shows the current channel number, and the dot-matrix display to the right shows the channel name. (see also Channel Settings).
"Site" - This functions the same as the Channel selection, but controls the CTCSS repeater access tone. When zero is selected, CTCSS is disabled, indicated as "0". (see also Channel Settings).
Mute button - Activating this on/off (toggle) button mutes the master volume control, silencing all audio output, no matter what the source. The RX indicator will turn red as a visual reminder. If any transmit key is pressed, Mute is disabled.
XMIT button - This is the Transmit or PTT (push-to-talk) button. Click and hold the left mouse button to transmit. Transmission will stop when the mouse button is released. When the XMIT button is selected (highlighted), the keyboard space bar may be used as a convenient PTT key. Click to select, or use the Tab key to change focus between the various controls.
Advanced operation:
MON button - Monitor function, typically used to open the squelch to check for a busy/open channel before transmitting on a shared-frequency system.
BCON button - (on/off) turns the Beacon function on or off (see Custom Settings). Used as a "marker" or status signal to let stations know a special situation exists. Transmits a short beep over the air every few seconds, delay and tone frequency determined in the Custom Settings.
Alert 1, Alert 2 - Activates the Transmit sequence followed by the Alert signal selected in Custom Settings for the button pressed. XMIT may be pressed immediately afterward to continue transmission for a subsequent voice announcement, as an example.
Cancel - Used to cancel an Alert transmission before it has completed. Will also discontinue beaconing if on.
A, B, C buttons - Custom function keys programmed in Custom Settings. Can be used for any variety of special features available with the radio or tone termination panel under control.