iRecall™
Instant Recall Recorder Software
![]()
SECTION V. Software Setup
NOTE: Click on red text for more details on highlighted item
CONTENTS
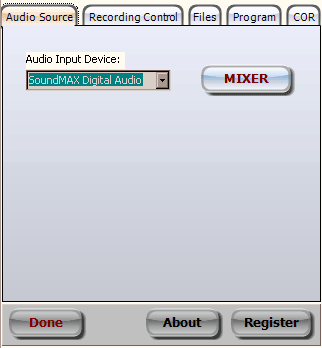
1. Audio Source tab
NOTE: All settings are saved upon exiting iRecall.
1.1 Run iRecall. Click Setup from the main screen. Note that all settings are saved upon normal close (exit) of iRecall.
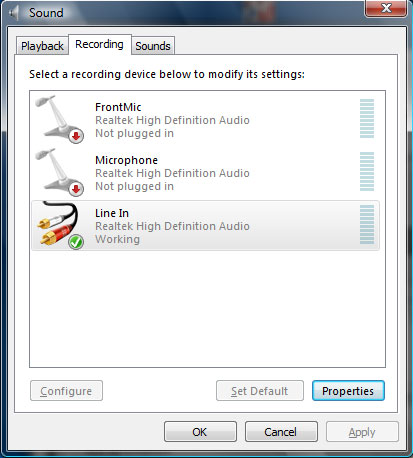
1.2 Click the Audio Source tab in iRecall Settings window.
iRecall audio source settings
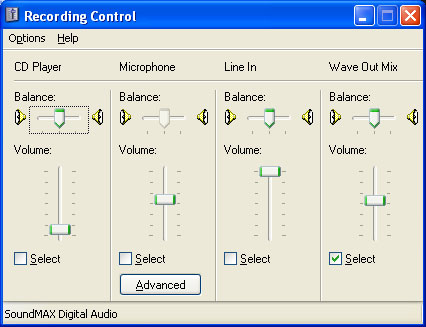
1.3 WINDOWS 2000/XP: Select the Audio Input Device from the drop-down list at right if more than one sound card is available. Click the MIXER button to open the Windows recording device selection dialog (shown below). Now select the desired input line by clicking the appropriate Select box. Adjust the input level of this device as described in step 1.4.
Windows 2000/XP Recording Control Panel
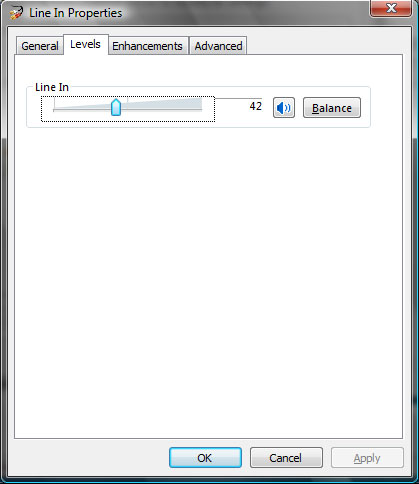
WINDOWS 7 & VISTA: Click the MIXER button to open the Windows recording device selection dialog (shown below). Click once on the desired input device to select. If more than one device is available, click the Set Default button to make it your default recording device. Click Properties, then select the Levels tab to adjust the input level of this device as described in step 3.4.
Windows 7 / Vista recording device selection (left) and properties (right).
1.4 Be sure the system Mute is un-checked during the setup process. Listen for receiver audio through computer speakers - it should be clear and crisp. Watch VU meter for level well into the blue, peaking in red is ok. Adjust the input level control as needed. It may also be necessary to adjust the receiver's volume control.
1.5 The MIXER button is provided as a convenience for accessing the Windows audio control panel if needed.
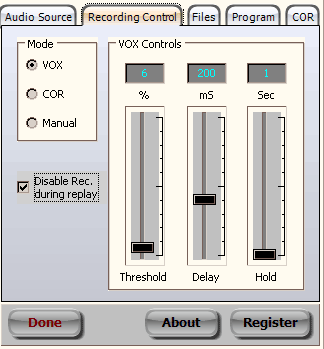
2. Recording Control tab
By default, the system is configured for VOX (voice-operated recording) and will usually function normally with these settings. COR (carrier-operated relay) control requires +5V (active high) trigger applied to serial port control line (RTS or DTR pin). This mode is normally used with 2-way radio equipment having a squelch or COR output. VOX and COR are both automatic recording modes. If desired, the user may select Manual Recording to start/stop using the Rec and Stop buttons.
2.1 Mode - Select recording mode VOX (default), COR (see Section 5) or Manual.
2.2 Disable Rec. during replay - Some computer sound devices only offer a single recording (input) source which includes any sound being played through the speakers. This can cause recording to be triggered during playback if this box is not checked.
2.3 VOX Controls - determines behavior of the voice actuated (VOX) recording mode. These settings have no effect on COR or Manual modes.
2.3.1 Threshold (%) - This represents the audio level as a percentage of full scale. Any audio higher than this setting will cause the system to start a new recording. The VU meter on the main screen represents a scale of 0 ~ 100%. Default setting is 10%.
2.3.2 Delay (mS) - (optional) to help prevent recording of very short duration sounds such as a click or cough. Default is 250 mS (1/4 of a second). Set to zero for no delay. Any sounds that occur before the delay timeout will not be recorded.
2.3.3 Hold (Sec) - Once a recording is started, it will continue for this period of time (1 ~ 10 sec.) after audio drops below Threshold setting. This gives time to capture a reply or short pause without starting a new recording.
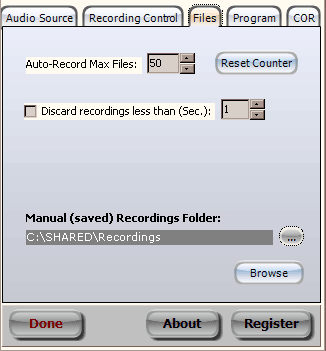
3. File settings tab
3.1 Auto-recorded audio files are stored in the Application Data folder, kept hidden by Windows™. The maximum number of files is determined by the Auto-Record Max Files setting, which defaults to a value of 10. This may be adjusted up to 500. iRecall keeps track of the files using an index counter, which may be reset to zero with the Reset Counter button. Once the index reaches Max setting, it will roll over to zero. Existing files will be overwritten.
3.2 Very short recordings which just may be a cough, beep or squelch-tail, can be discarded (overwritten) if desired.
3.3 Manual Recordings Folder - this is where manually initiated or saved recordings will be kept. These files will not be overwritten and may be retrieved at any time using the Browse button.
3.3.1 To set or change, click the
button.
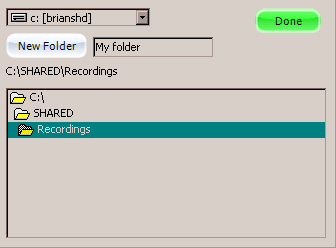
Directory chooser dialog
Click Done to save in highlighted folder. To create a new folder in the current directory, type a name and click New Folder
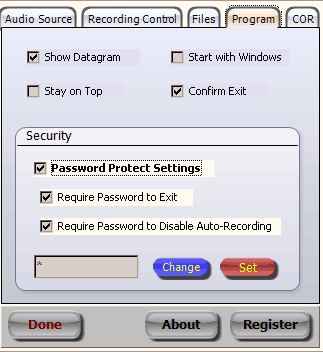
4. Program settings
4.1 Show Datagram - turns the scope display (waveform visualization) on/off.
4.2 Stay on Top - causes the iRecall window to remain in front of other programs or windows on the desktop at all times.
4.3 Start with Windows - determines whether iRecall will start up automatically when Windows is booted.
4.4 Confirm Exit - causes a dialog box to appear confirming you want to exit the program before closing.
4.5 Security - These options control user access to certain features and controls.
4.5.1 Pasworrd Protect Settings - Checking this box will enable the other two options and require user to enter a password to access program settings. This also enables the Change/Set password buttons.
4.5.2 Require Password to Exit - Causes the password dialog to open before exiting the program
4.5.3 Require Password to Disable Auto-Recording - This option will prevent the user from disabling the recording system without a password. If it becomes disabled due to an error, the user will be able to re-enable without a password.
4.5.4 Change/Set Password - Click the Change button to enable editing of the password. Enter password carefully. Password recovery will require a Tech Support call! To save new password, click Set.
5. COR settings
COR = "Carrier Operated Relay" for use with radios having an available carrier or squelch signal.
This tab is only enabled when COR is selected in Recording Control.
Select Serial Port from the drop-down list. If port is available, it will be opened for access. Select the desired RS-232 Control Pin (pin numbers are provided for standard 9-pin connector). Whenever a HI (+5V) is applied to selected pin, recording will begin and and continue until the pin returns to the LOW state (0V). If Invert option is checked, the input will trigger on a LOW (0V) signal.
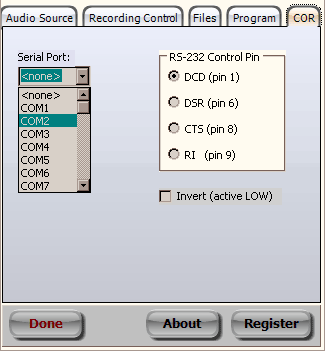
WARNING: Applying more than 12 Volts to a standard serial port or 5V to a USB/serial adaptor could permanently damage the port!
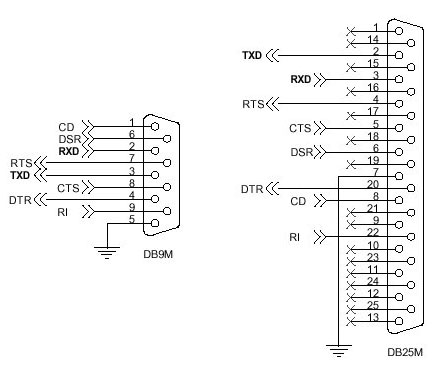
RS-232 pinouts as seen on back of computer:
6. Buttons
Done - Close settings window, return to main screen. All settings will be save when program is closed.
About - Displays the "About" window, version and license info.
Register - Opens the registration dialog, where activation key is entered. See Installation Section.
Next section: Using iRecall